
Lakukan hal yang sama untuk setting awal komputer host/ komputer kantor dan komputer client/komputer rumah / laptop sama seperti di atas, hanya penamaan dan Hamachi ID saja yang berbeda
Do the same for the initial setting the host computer / office computer and client computer / home computer / laptop the same as above, only the naming and Hamachi ID just a different
1. Pada saat pertama, tampilan akan sama seperti diatas, pada header di atas terdapat angka 0.0.0.0 , ini merupakan nomor Hamachi ID anda yang masih kosong, untuk mendapatkan IP Address/ Hamachi ID anda, pastikan koneksi internet anda sudah tersambung, Klik tombol 'power on' yang terletak di sebelah kiri bawah, maka Hamachi akan memberikan nomor Hamachi ID anda beserta nama untuk Hamachi anda, seperti gambar di bawah ini :
At first, the display will be the same as above, the header at the top there are a number 0.0.0.0, Hamachi is your ID number was available, to obtain an IP Address / Hamachi ID, make sure your internet connection is connected, Click the 'power on 'which is located on the lower left, then Hamachi will give your ID number and name for your Hamachi, as shown below:
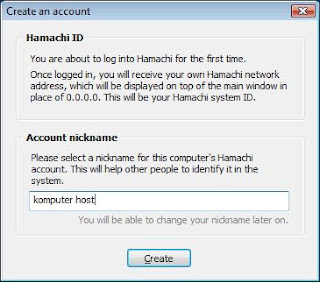

Give name / nickname for your Hamachi, adjust it with the computer names that will be installed, eg the host computer to your office computer, or according to your taste. if it is press the Create button, leave to Hamachi completed

Sampai disini Hamachi sudah selesai untuk tahap pertama, kita sudah mendapatkan Hamachi ID dan Account Hamachi (nama untuk Hamachi)
Until here Hamachi is complete for the first stage, we've got Hamachi Hamachi ID and Account (the name for Hamachi)
Bagaimana Membuat Network Baru
How to Create New Network
Bisa dilakukan di komputer host / komputer rumah, baiknya kita lakukan di komputer host, caranya :
Can be done in the host computer / home computer, we should do in the host computer, how:
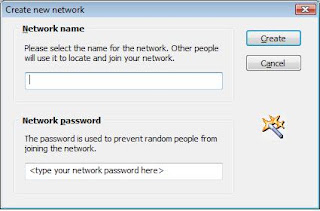
1. Untuk membuat network baru, klik tombol 'Create or join networks' di sebelah kanan bawah, kemudian klik 'Create a new network', maka akan muncul tampilan seperti di bawah ini:
To create a new network, click the 'Create or join networks' on the right bottom, then click 'Create a new network', then the display will appear as shown below :
Until here Hamachi is complete for the first stage, we've got Hamachi Hamachi ID and Account (the name for Hamachi)
Bagaimana Membuat Network Baru
How to Create New Network
Bisa dilakukan di komputer host / komputer rumah, baiknya kita lakukan di komputer host, caranya :
Can be done in the host computer / home computer, we should do in the host computer, how:
1. Untuk membuat network baru, klik tombol 'Create or join networks' di sebelah kanan bawah, kemudian klik 'Create a new network', maka akan muncul tampilan seperti di bawah ini:
To create a new network, click the 'Create or join networks' on the right bottom, then click 'Create a new network', then the display will appear as shown below :
- Isikan Network Name dengan nama yang sesuai dengan kriteria anda, misalkan officeme-athome (jika nama network sudah ada maka akan error, ganti nama network dengan yang lainnya)
- Isikan Network password (pastikan password anda, karena case sensitive, maksudnya jika anda mengunakan huruf besar dan huruf kecil akan di baca sesuai dengan yang anda input pada saat itu)
- Jika sudah selesai tekan tombol Create
- Fill in the Network Name to the name of that match your criteria, for example officeme-athome (if the existing network name will be errors, replace the name with the other networks)
- Fill in Network password (be sure your passwords, because case sensitive, meaning if you use uppercase and lowercase letters will be read in accordance with your input at the time)
- If you are finished press the Create button

Bagaimana Bergabung dengan Networks
How to Join Networks
Setelah kita membuat network, maka langkah selanjutnya adalah menggabungkan komputer client / komputer rumah / laptop dengan network yang telah kita buat, caranya adalah :
Once we make a network, then the next step is to combine the client computer / home computer / laptop with a network we have created, how is:

click the 'Create or join networks', then select 'Join an existing network ..' located on the right bottom, then the display appears as below:

- Isikan Network password dengan password yang telah kita buat
- Jika sudah selesai tekan tombol Join
- Fill in the Network Name to the name of the network we have created (example: officeme-athome)
- Fill in network password with which we have made
- If you are finished press the Join
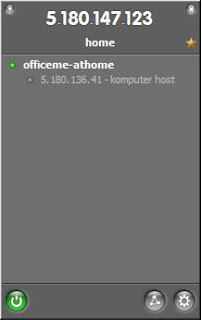
untuk mengetahui apakah Hamachi komputer host / komputer rumah dalam keadaan tersambung adalah tombol di samping Hamachi Id berwarna hijau sedangkan jika dalam keadaan mati berwarna abu-abu.
home computer / laptop has joined the network in the office, you can do Remote Desktop, either from office or from home, as long as the Hamachi at the office and at home connected to the internet.
to see if Hamachi host computer / home computer is connected in a state of the button next to the green Hamachi Id whereas if the dead gray
Untuk melakukan Remote Desktop melalui internet silahkan lihat pada Remote Desktop Protocol (RDP)
No comments:
Post a Comment
Note: Only a member of this blog may post a comment.